How to Replace a 3-Way Light Switch

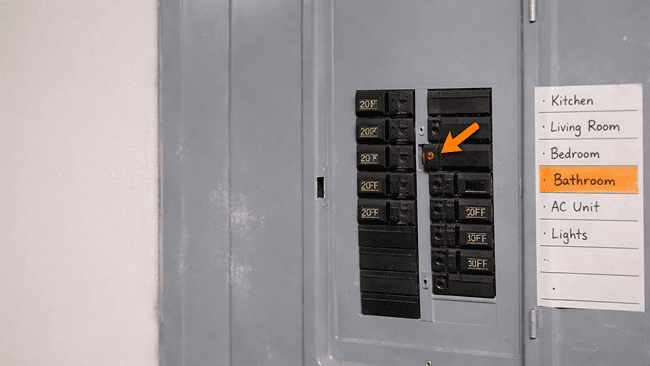
Start by removing the electrical cover here, uh, by removing the two slotted screws right there. Locate your breaker panel and turn off the breaker to the desired circuit like that. You're gonna remove the two screws that are here that hold the switch into place. Sometimes they're slotted screws, sometimes they're Phillips.
In this case, it's, it's called what's an ECX. Screw, which I can get it to focus here, is basically a Robinson bit with a slot slotted combination. And you could see it'll fit in there perfectly. And then you loosen the screws and take the switch off and you pull it out of the box like this. And if you notice, this switch is going to have two connections on one side.
And one connection on the other side, followed by a ground here. And if you'll also notice that this wire is very poorly connected, don't be that person that does it like this, create a fire or another safety hazard. But also the reason why I'm changing out this switch. Oh, and you could see it popped out of there, so that wasn't even in there at all.
The switch is cracked on the back. So this is why we'll be replacing this switch. And you're gonna go ahead and take the wires off of each one of these connections to one on that side, and again, one on that side, plus your ground down here, which is gonna be a bear wire and one. Of these wires will have power, and it almost always connects to the black screw that is called your common, and on both switches will have a power wire connected to the black connection there.
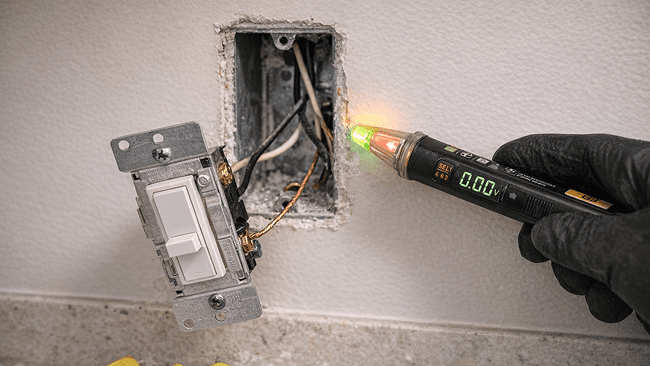
Okay. Once you have your switch out, you're gonna have three wires, and I'm using this. A new setup here to show you that what if you had a situation and you don't know which wire goes to where. It's very easy to check. You use a multimeter or a tester, and you find which wire has 120 volts, uh, going out to it, going out from the wire.
And in this case, it's gonna be this one here. That's gonna be our live 120 volt wire. And again, that connects to the black screw of your switch. Um, this is an old setup. This happens to be the correct connection of this one, but again, it's just gonna go to the black common. Screw of your switch. And when you do that, you just loop it clockwise, loop the wire clockwise, and it fits underneath the screw, just like that.
And then you tighten it down and you'll have a nice tight connection that is completely safe for you. And if you have a situation where the old switch has wires that are actually plugged into the back of the wire. Cut those from the switch and then strip them about a half an inch and then loop them clockwise just like this.
Once you have your power connected to the black screw, you have your two other wires and they can be black, they can be red, they can be white. They're what's called traveler wires, and they communicate with the other switch to control the fixture independently. It doesn't matter which wire goes to which screw, as long as they're connected to each traveler screw on your switch.
So you just loop it just the same by looping it clockwise around the screw and tightening. Now once you have everything connected, it's safe practices to wrap the edge of the switch or outlet in electrical tape. So when you put it back in the metal box, it doesn't make contact with the box or make contact with the box over time and arc out or create a safety issue.
Go ahead and stuff the switch back in the box. Screw it to the box and then reinstall your cover on the wall. Now for the other three way switch that is not connected directly to line power, you have your same three wires. If you remember from the other one, you had your black traveler wire on one side, and then on the other side you had your red traveler wire, and they go to the same respective traveler screw positions.
The third wire is also a common wire wired to the same black screw, but in this case, this. Common wire goes out towards the light rather than like the other switch. It was an input voltage into the switch, and that's how you wire a three-way single pole double throw switch. This is just a regular switch.
It will show on at the bottom. And when you flip it off at the top and it will have two wire, two screws on one side with no screws on the other side, and then your normal ground at the bottom. How this is connected, you just wire one wire to each screw and it doesn't matter which wire goes to which screw.
Don't forget to turn your breaker back on so you have power, and go ahead and check your work. If it is a regular switch that you replaced, um, toggle it on and off to make sure it controls the lights. Normally, if it is a single pole, double throw, three-way switch. Make sure you check each location, each switch location to verify the lights are going on and off independently from each switch.